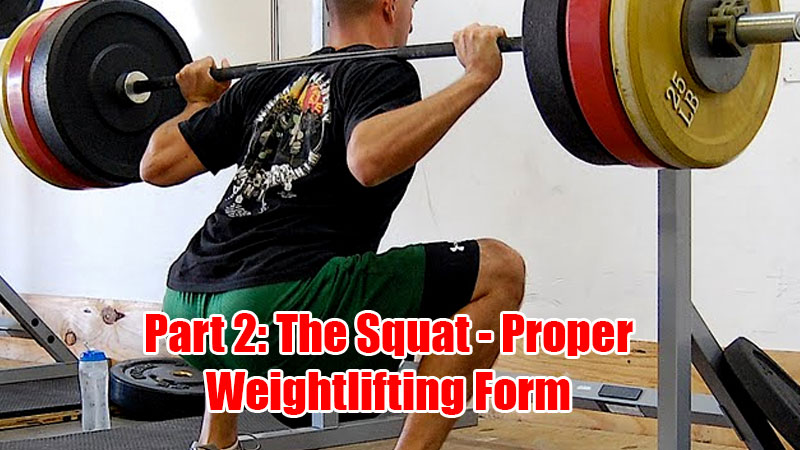
It’s referred to as the King of exercises. But how do you really squat with proper weightlifting form.
You’re here because you want to sort out your squat. You want to build huge leg mass and ramp up power, speed and force development. Without the right tools though you’re not quite sure if you’re ticking the boxes for proper weightlifting form or not.
You’re in luck.
In Part 1 of our ‘big three’ guide to proper weightlifting form, we took a detailed look at the bench press.
Now it’s time for the greatest lower body mass builder of them all.
The squat is as much an art as it is a science. And with so many technical points and mechanical influences to go through, you’ll need to get a strong coffee for this one; it’s long.
In this comprehensive guide, we break through the scientific research and look at how you should squat to achieve great technique and unbreakable form.
It’s time to drop it like it’s hot and build some quad mass…
Everything You Need to Know About the Squat
Everything goes quiet as you take those four short steps towards that shiny, chalked-up barbell. You dip under and sit it across your now tense traps.
As you un-rack the barbell you feel it bending under the sheer load of the red plates that sit comfortably on each side. Pressure builds in your core and face as feel every pound driving you into the floor.
Is it too heavy? Nah, not today.
Today’s the day you nail that PR and show the squat who’s boss. B*tch get ready.
With a solid stance and a rock-hard core you descend, pause and drive with everything you’ve got.
Great form, strong technique and a full range of motion.
It’s a goddamn beautiful lift. And if it was in comp you’d have three white lights and an audience that was deafening you with thunderous applause.
Yep, the squat is awesome.
The benefits of a hitting the bar for squat day
The squat is a lower body leg exercise. But in reality, it’s a full body movement that requires expert coordination, flexibility, and form to achieve proper weightlifting form.
It’s classed as an axial loading exercise as it places tension through the spine.
Weak technique and sloppy control will lead you down the path of sub-standard gains and potential for injury. But proper weightlifting form provides a foundation for a whole range of benefits.
- Increases muscle mass – as far as lower body development goes, you’ll not find anything that rivals the squat. It’s better for quad mass even when compared to the deadlift.
- Strength development – the squat is the best lower body strength developer out there.
- Athletic performance – as a lower body compound exercise, the squat has carryover to athletic characteristics such as jumping and lunging.
- Anabolic hormone release – according to clinical research, a big squat workout will pump out more testosterone and growth hormone into your bloodstream.
Biomechanics of the squat – what you need to know
The importance of femur length
The femur is otherwise known as the thigh bone. The bottom of this bone forms your knee joint by attaching to your tibia via various ligaments and connective tissue.
The head of your femur fits into your hip socket and forms the acetabulum joint. Some people have a naturally shallow hip socket which gives them a large range of motion when squatting, and others have a deep socket with more limited motion.
The length of your femur affects how you squat.
Those with longer femurs relative to their trunk find that in order to keep the bar positioned over the mid-foot, they have to lean forward to maintain a center of gravity that stops them from falling on their ass.
They also struggle to hit that ‘ass to grass’ position you’re told is the be-all and end-all of squatting.
Spoiler: it’s not.
Those with shorter femurs find it easier to maintain an upright trunk and can hit those low positions with ease.
This is a great video explaining femur length and squat ability (for those who aren’t afraid to get balls deep in the science).
The set-up
You’ll need a safety rack or squats stands, a barbell (preferably a proper Olympic barbell), a flat and stable surface to squat from.
You’ll also need some cast iron or rubber plates too.
There’s actually a few different ways to organize your set-up so you might need a bit of trial and error.
Setting up the rack
The hooks or safety catches need to be set at around shoulder height. That way you can collect the bar with a slight bend in your knees.
The last thing you want here is to have to complete some kind of crazy pirouette on your tiptoes to pull the bar over the hooks.
And if it’s too low you’ll waste energy trying to squat out of the rack.
[infobox]Just the tip: Set the safety hooks at shoulder height to make your walkout easier.
[/infobox]High bar, low bar
The first thing to consider is where you actually sit the bar for your squat.
Once you’ve dipped under the bar and got yourself comfortable, you need to think about where the bar will rest throughout the squat itself.
For the high bar position, you’re looking at resting the barbell on the meat of your traps. You’ll need to shrug your traps upward fairly hard to form a shelf for the bar to sit on. Avoid sitting it on your spine at all costs.
For low bar, you’re resting the barbell more on your rear delts.
Again, avoid letting the bar sit on the bones of the spine and scapulae, and instead let it sit comfortably on the mid-traps and back of your shoulders.
Whether you’re in a high or low position isn’t that important. They’re both okay to use and what you might find is that one position suits you more than the other.
In reality, a low bar position will likely lead to a more pronounced forward lean. And a high bar will help to keep the trunk upright.
But go with whatever feels most comfortable.
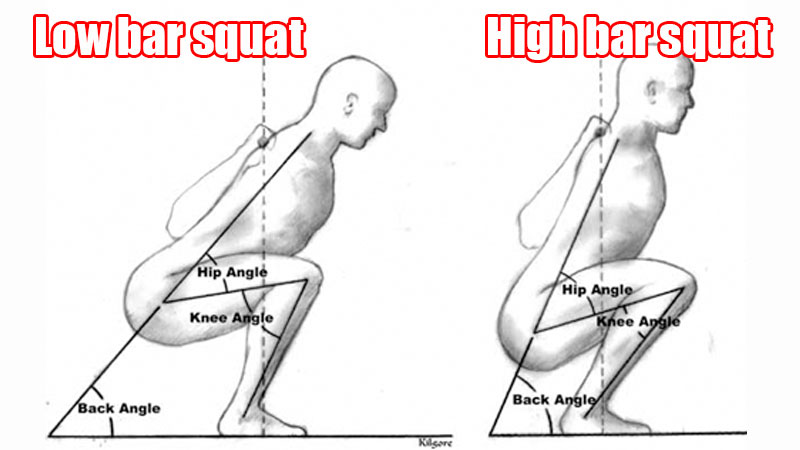
Just the tip: Whether you squat high bar or low bar is really down to preference. Choose what feels best for you and your individual squat mechanics.
[/infobox]Arm position
The next part of your set-up is to look at where you hold the bar while squatting. Again, there’s no real set position you have, and much of it is about comfort – which is much of what proper weightlifting form is all about.
If you’re going for a high bar position you’ll find that a narrow position will allow you to shrug your traps easier, and therefore provide a nice shelf for the bar to sit on. It’s pretty much the same for the low bar position too, only you’re retracting your shoulder blades and not elevating them.
If a narrow position is painful or you’re just plain too jacked to go narrow, you should opt for a comfortable position which isn’t needlessly wide. You can still pull your scapulae together in a wide position, but it isn’t as easy and can lead to the bar slipping down your back.
[infobox]Just the tip: A narrower grip of the bar helps to set your scapulae in place for both high and low bar positions. Aim to go as narrow as feels comfortable.
[/infobox]Gripping the bar
This isn’t a white-knuckle ride and you don’t need to ‘over-grip’ the bar.
But you will need to stabilize your position and stop the barbell from slipping by keeping your wrists straight and your thumb nestled sweetly over the bar.
Low bar lifters, in particular, will need to hold the bar using the palm of the hand for support. But you still don’t need to grip it like your life depended on it.
With a secure grip, you should be able to point your elbows at the floor pretty easily. If you want to point them back slightly (works well in a low bar position) that’s fine.
If you get any kind of elbow pain, adjust your position until you feel comfortable.
Make your walkout solid
Now that the key set-up points are sorted, the next job is to nail the walk-out.
Although you might think this is an easy job, you need to get it right or it’s all downhill from there.
To recap; at this point, you’ve decided if you’re repping team high bar or low bar. Your scapulae is primed to collect the bar and your grip is firm but not too tight. Last of all, your elbows are pointing down or slightly back to help cushion the barbell and hold it in position.
You’ve got a couple of options from here…
You can either use a staggered stance to jack the bar up, or you can plant your feet under the bar at hip-width apart and hike the bar up from there.
It’s all down to preference.
Push through your heels and keep your core solid as you drive the bar upwards. Go for power here and teach the bar who’s boss from the very start.
Once the bar is up it’s time to clear the rack.
Take small and sure steps backward until you’ve cleared the hooks. You don’t need to go too far back as it’ll be a long walk to re-rack once you’ve finished your set.
How wide should your stance be?
Before you hit your first rep you need to sort your stance out.
Much of this is down to comfort. Based on femur length you may find a shoulder-width (or wider) stance with toes pointing out slightly will help you hit depth during the squat.
Others will find that a hip-width stance with toes facing forward allows them enough depth to squat effectively with proper weightlifting form.
Much of what you choose for your stance is down to two things:
- Genetics (how deep your acetabulum is)
- Mobility
It makes sense to at least practice your stance before loading up a heavy bar. The last thing you want is to load up and find that your stance isn’t right.
Maybe try a few reps at different stance widths before you decide which suits you the most. You’ll automatically know which stance suits you and your specific needs.
Stance width considerations:
- Wider stances activate adductor (inner thigh muscles) and glutes more
- Quad and hamstring activation doesn’t change, regardless of stance
- Squatting using the stance you’d use during jumping helps to improve jump performance significantly better
- Wider stances reduce range of motion, therefore, might be better during powerlifting where the idea is to lift as heavy as possible
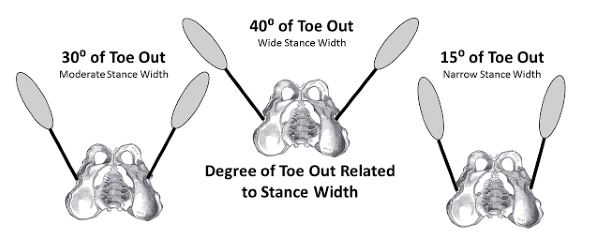
Just the tip: You should point your toes outward when using wider stances. This allows safer, more natural movement of the hip and knee.
[/infobox]Going down? The descent
It’s taken a while to get set-up but now your there. Your technique’s looking tight with the bar and you’ve achieved proper weightlifting form so far.
Now it’s time to shift some load.
Break at the hip and knee simultaneously to keep your torso in an upright position. Break at the hip first and you’ll find that you lean forward more.
Neither is right or wrong and much of the right torso angle for you is to do with bar position and stance-width.
Ankle mobility will also play a part. Breaking at the hip first doesn’t require as much range of motion at the ankle joint itself.
Descend under control
Your descent doesn’t have to be overly slow or you’ll leak the energy you need for the climb back to the top of the squat. Go too fast though and the momentum might force you off balance.
Aiming for around 1-2 seconds on the way down helps to keep tension on the muscles and grow some impressive wheels.
Going slightly faster to take advantage of your stretch reflex (elastic recoil) helps you bounce out of the bottom of the squat. But it also reduces the amount of mechanical tension passed through the muscles.
In terms of breathing, you should take a deep breath in just before you descend into the squat. It’s referred to as the Valsalva technique.
You should hold this throughout the full rep (including ascent) and only breathe out once you’ve finished the full rep.
This is the best way to optimize trunk stability and increase intra-abdominal pressure.
[infobox]Just the tip: Increasing intra-abdominal pressure with the Valsalva technique helps to boost core strength. But should only be performed if your blood pressure is normal and healthy.
[/infobox]What depth should you be rooting for?
This has always been a contentious one. Bros will tell you that if you don’t hit as to grass you aren’t even squatting.
“Hamstrings should cover your calves” they’ll say.
Others will tell you that you just need to hit parallel. Pussies will tell you to use the leg press instead.
The reality is that you just need to go as low as you can with the mobility and stance-width you’ve got.
Everyone has different body proportions.
Telling every single person to hit the same depth is the equivalent of telling everyone on the beach they have to wear factor 8 sun protection no matter what skin type they’ve got.
It makes no sense.
And if you’re worried about deep squats being bad for your knees, don’t. It’s not bad for them at all.
[infobox]Just the tip: This isn’t an excuse to rep out sh*tty half-baked reps. Go as low as you CAN, not as low as you WANT.
[/infobox]The upward climb: The ascent
Let’s not waste too much time while you’re sat ‘in the hole’ with a heavy load on your back.
It’s time to climb the hill and get back to the start position.
The name of the game here is to maintain proper weightlifting form and keep everything tight as you drive the bar upward with everything you’ve got.
There are a few key pointers you need to follow to achieve a successful ascent-phase squat:
- Pull the bar into your traps to tighten up your upper body
- Maintain a slight forward lean until you pass the sticking point
- Maintain intra-abdominal pressure and don’t breathe out until you’ve completed the rep
- Drive through your heels and not the forefoot
Chances are at some point during the upward phase you’ll encounter a sticking point. This is the angle during the squat where the weight feels heaviest.
If you’re going to fail, you’ll probably fail here.
For most people, the sticking point kicks in just above parallel. And while you have to fight your way through it like Braveheart fought the English, once you’ve hacked your way through the sticking point, it should be plain sailing from there.
Note: screaming “freeedddooommmm” during your squat is not advised.
[infobox]Just the tip: Focus on gluing your feet to the floor and spread your toes as you drive your heels into the ground. This helps to create a stable base and a solid platform to push through.
[/infobox]Summary – Proper Weightlifting Form During the Squat
There you have it. You’ll be sporting bespoke pants in no time as you develop a pair of tree-like quads and an ass that’ll drive the chicks wild.
Use these pointers next time you hit the bar for leg day and you’ll soon find that you squat easily with proper weightlifting form.
Okay, where next?
If you haven’t already read it, check out our detailed guide on how to bench press with proper weightlifting form.
That way you can get your upper body just as jacked as your quads.
Or if you’re still wanting to optimize lower body development you can read over out guide on deadlifting with proper weightlifting form.